Case Study
Integration with Microsoft Teams
Background:
A mid-sized IT service provider sought to improve its incident management
process by enhancing communication and collaboration among its support teams. The company
used ServiceNow for IT service management and Microsoft Teams for daily communication.
However, the lack of real-time notifications regarding incident updates led to delays in response
times and poor visibility into ongoing issues.
Objective:
To integrate ServiceNow with Microsoft Teams to enable real-time notifications about
incidents, streamline communication, and improve overall incident resolution times.
Goals for Integrating ServiceNow Incident Data with Microsoft Teams:
1. Immediate Awareness:
Instantly notify team members about new incidents created in
ServiceNow to ensure timely response.
2. Centralized Tracking:
Provide a consolidated view of incidents within Teams for easy
monitoring and discussion.
3. Facilitate Collaboration:
Enable real-time discussions and collaboration on incidents
directly in Teams, reducing communication delays.
4. Streamlined Updates:
Automatically share status updates on incidents to keep all
stakeholders informed throughout the resolution process.
5. Improved Response Times:
Enhance incident acknowledgment and resolution times by
providing immediate visibility into new incidents and facilitating quick communication.
Integration Steps:
Section A (Install a Required Plugins for Teams)
1. Access Plugins:
As a System Administrator, navigate to System Definition > Plugins
in the ServiceNow navigator.
2. Search for the Plugin:
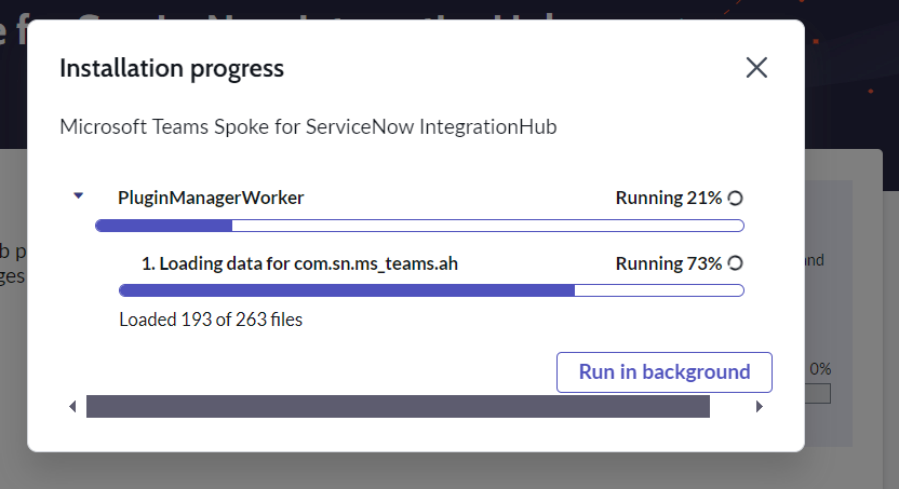
In the Plugins page, use the search bar to look for the Microsoft
Teams Spoke for ServiceNow IntegrationHub.
3. Install the Plugin:
Once found, click on the plugin and follow the prompts to install it.
Section B: Install Microsoft Teams and Link with Company Registered Email
1. Download Microsoft Teams:
Visit the Microsoft Teams download page and download the application suitable for your operating system (Windows, Mac, or mobile).
2. Install Microsoft Teams:
Run the downloaded installer and follow the prompts to complete the installation process
3. Launch Microsoft Teams:
Open the Microsoft Teams application after installation is complete.
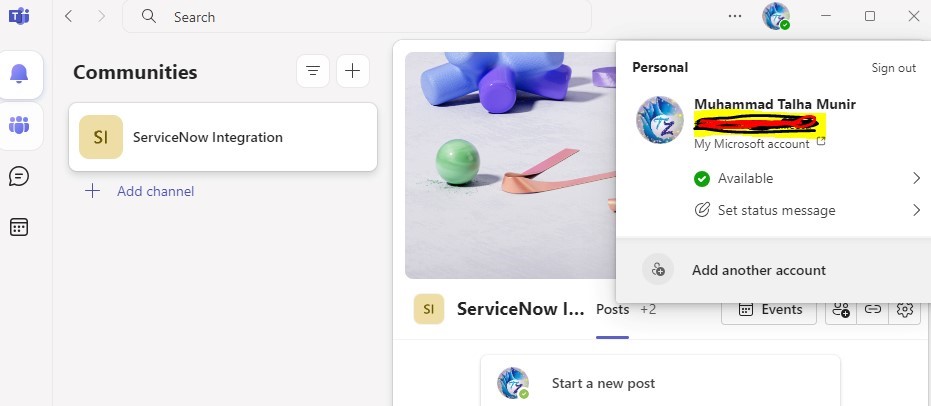
4. Sign In with Company Email:
Click on the Sign In button and enter your company-registered email address.
Follow the authentication process, which may include entering your password and completing any multi-factor authentication (MFA) steps.
Follow the authentication process, which may include entering your password and completing any multi-factor authentication (MFA) steps.
5. Set Up Your Profile:
Once signed in, set up your profile by adding your name, profile picture, and other relevant information.
Section C: Create a Channel in Microsoft Teams
1. Open Microsoft Teams:
Launch the Microsoft Teams application.
2. Select Your Team:
Navigate to the team where you want to create the channel.
3. Create a Channel:
Click on the More options (three dots) next to the team name.
Select Add channel from the dropdown menu.
Select Add channel from the dropdown menu.
4. Name the Channel:
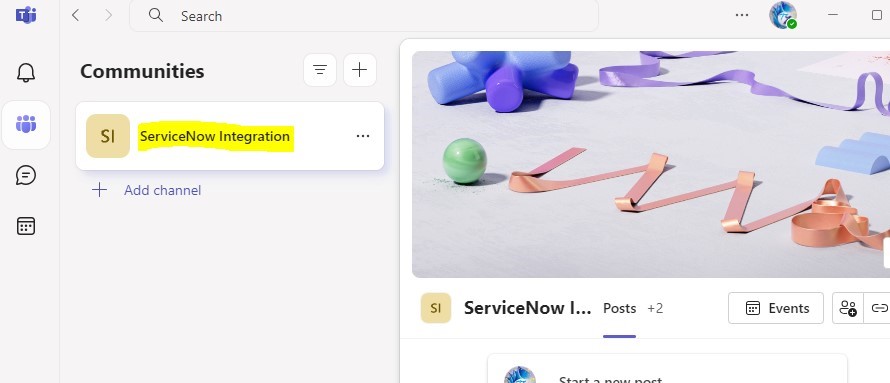
Enter ServiceNow Integration as the channel name.
5. Set Privacy:
Choose the privacy setting (Standard – accessible to everyone on the team or Private – accessible only to specific members).
6. Add a Description (Optional):
Optionally, add a brief description of the channel’s purpose.
7. Create the Channel:
Click on the Add button to create the channel.
8. Confirm Creation:
Verify that the ServiceNow Integration channel appears in the list of channel under your team.
Section D: Add a Webhook in Microsoft Teams
1. Access Apps:
In Microsoft Teams, navigate to the Apps section located in the left sidebar
2. Search for Webhook:
Use the search bar at the top to type in Webhook.
3. Select Incoming Webhook:
From the search results, click on Incoming Webhook.

4. Add the Webhook:
Click on the Add button to ntegrate the Incoming Webhook into your channel
5. Select the Channel:
Click on Add to team and select the ServiceNow Integration channel you
created earlier

Section E: Create a New Flow in Flow Designer
1. Navigate to Flow Designer:
Go to Process Automation > Flow Designer in the ServiceNow navigator.
2. Create a New Flow:
Click on the New button to initiate a new flow.
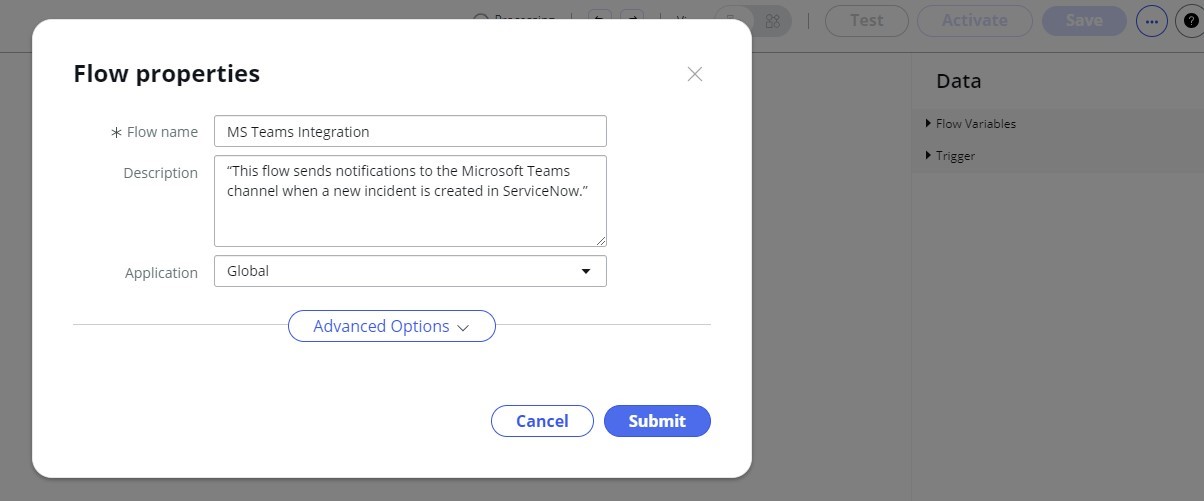
3. Name the Flow:
Enter MS Teams Integration as the name for the flow.
4. Add a Description:
Provide a brief description, such as: “This flow sends notifications to the Microsoft Teams channel when a new incident is created in ServiceNow.”
5. Scope:
Note that the scope is automatically set to Global.
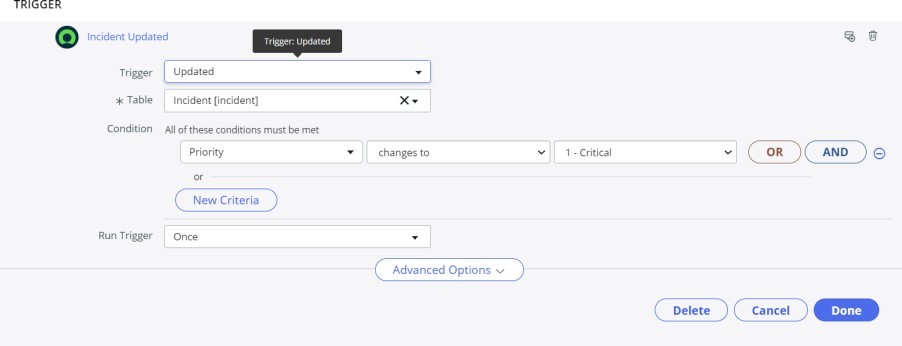
6. Define Flow Trigger:
Click on + Add Trigger and select When a record is created.
Choose the Incident table as the target for the trigger.
Choose the Incident table as the target for the trigger.
7. Click on Action:
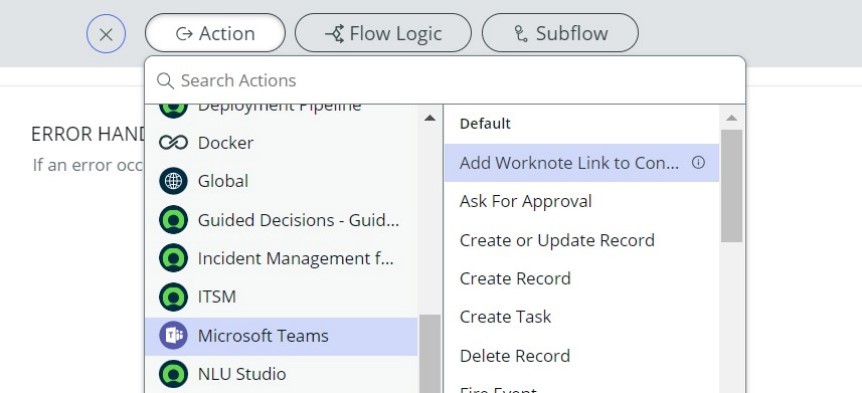
Click on + Add Action to specify what the flow should do after the trigger occurs.
8. Select Microsoft Teams:
From the list of available actions, choose Microsoft Teams.
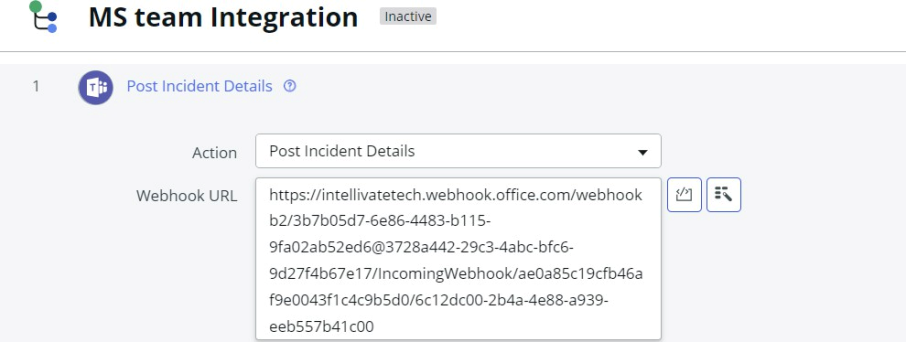
9. Click on Post Incident Details:
Select the option to Post Incident Details to configure the message that will be sent to the Teams channel.

10. Provide Webhook URL:
In the configuration settings, paste the webhook URL you copied from the Incoming Webhook setup in Microsoft Teams
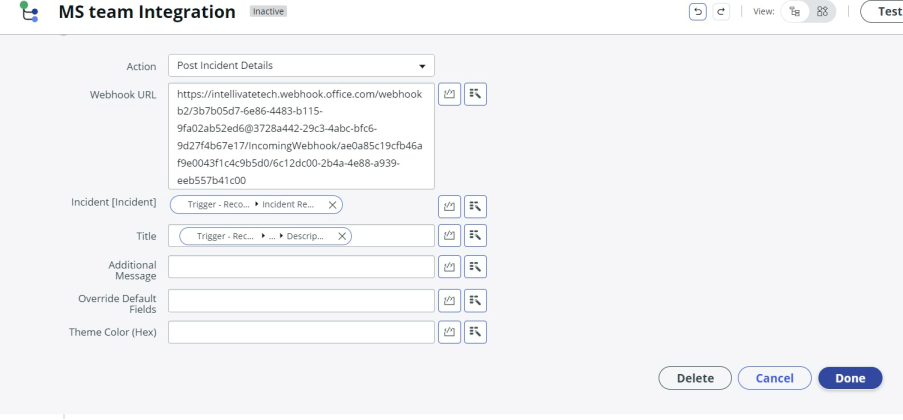
11. Give Title as Description:
Set the title of the message to match the incident's description or provide a relevant title that summarizes the incident.

12. Click on Done:
After configuring the action, click on the Done button to finalize your settings for this action.
13. Save the Flow:
Click on the Save button to finalize and store your new flow.
14. Click on Activate:
Once all configurations are complete, click on the Activate button to enable the flow.
15. Confirm Activation:
Ensure that the flow is now active and ready to send notifications to Microsoft Teams when new incidents are created.

Section F: Testing the MS Teams Integration Flow
1. Navigate to Incidents:
Go to Incident > All Incidents in the ServiceNow navigator
2. Open an Incident:
Select an existing incident from the list to open its details.

3. Change Priority:
Locate the Priority field in the incident form.
Change the priority to 1-Critical.
Change the priority to 1-Critical.
4. Add Description:
In the Description field, provide additional details about the incident, if needed.
5. Save the Incident:
Click the Update button to save the changes to the incident

6. Open Microsoft Teams:
Navigate to the ServiceNow Integration channel in Microsoft Teams
7. Check for Messages:
Look for a notification message related to the incident you just
updated.
8. Review the Message:
Ensure that the message contains the correct incident number,
description, updated priority, and any other relevant details.
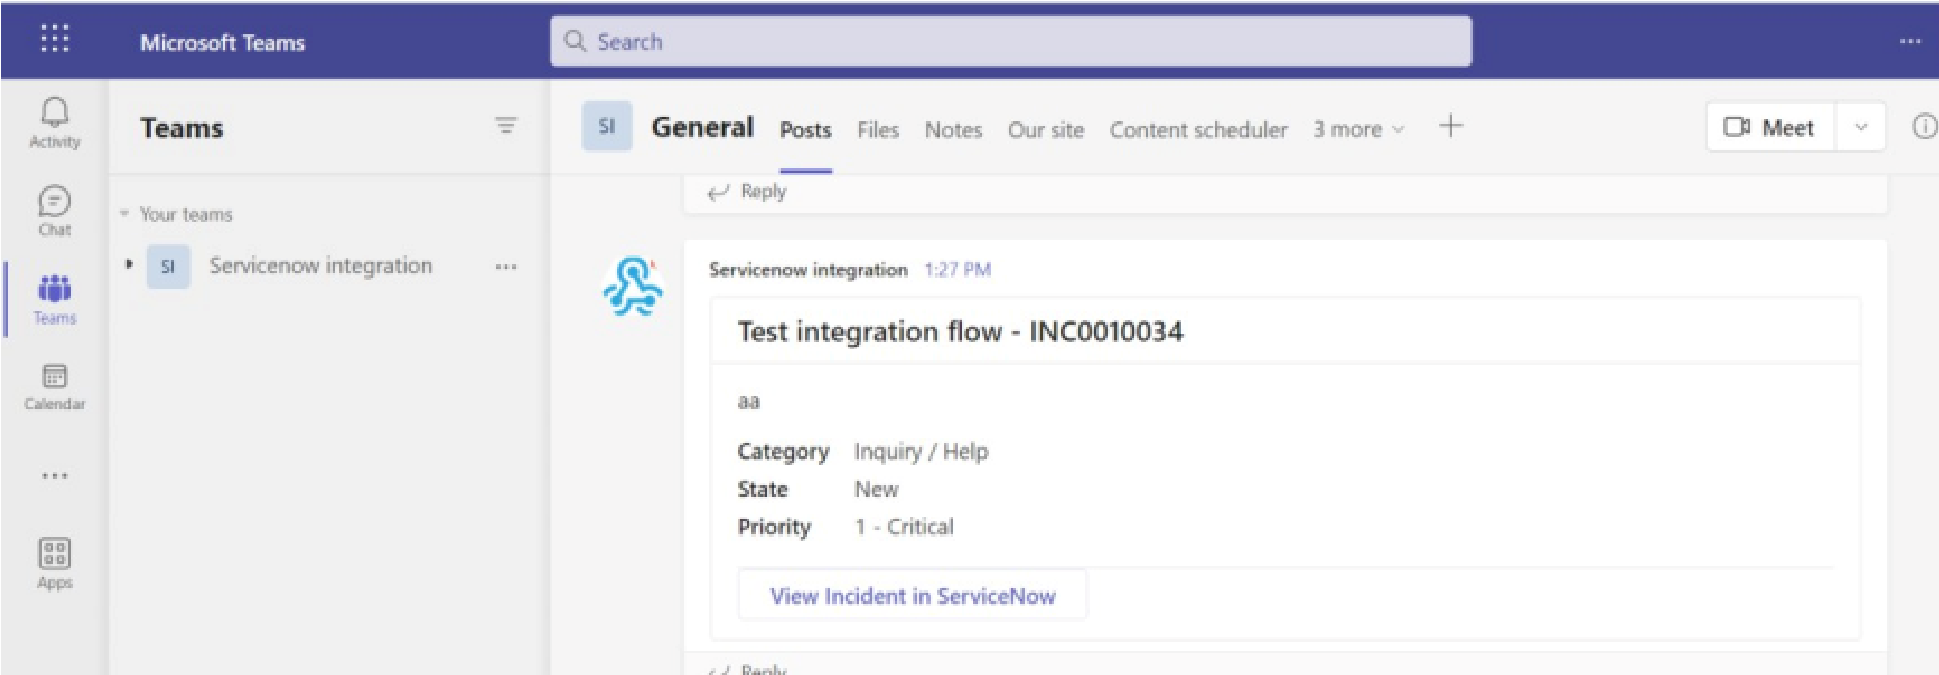
9. Confirm Flow Functionality:
Verify that the integration is functioning as intended,
sending timely notifications to Microsoft Teams when incidents are created or updated.
Conclusion:
This article demonstrated the seamless integration of ServiceNow with Microsoft Teams to enhance incident management. By using ServiceNow's Flow Designer and Microsoft Teams' Incoming Webhook, we created an automated notification system that keeps team members informed of new and updated incidents in real time. The step-by-step guide covered everything from plugin installation to testing, illustrating how organizations can improve operational efficiency and collaboration.
The integration fosters a proactive approach to incident management, allowing teams to focus on swift resolution and ultimately enhancing service delivery and customer satisfaction. This case study highlights the effectiveness of integrating these platforms to streamline communication and improve incident response processes in modern organizations.